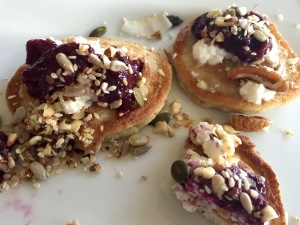
Coconut Flour Breakfast Crumpets

Tags

, , , , , , , , ,


Coconut Flour Crumpets

Well, it’s been a while (almost a year) since I last posted. Life got busy- hubby’s 40th, our church’s opening with a massive market and auction and then I did a basic sewing course and ended up feeling super guilty for not posting… and then you know what happens.

We have also made quite a bit of a lifestyle change. Since discovering that my oldest struggled with various intolerances a few years ago we had adopted a healthier lifestyle, trying to flavour food more naturally and cutting out preservatives, colourants, artificial flavourants and so on and so on. But towards the end of last year we started eliminating grains and sugar. Because I have always baked treats for the boys and never been able to buy any food that is pre-prepared or packaged, this didn’t change much of my time spent in the kitchen. But it did mean I would have to discover new recipes that were easy, relatively affordable and tasty. Today I’m sharing one of those with you.

These coconut flour crumpets are adapted from a pancake recipe I came across that is made with cream. Because dairy is one of the uncertainties, I tweaked it and came up with what is now a firm favourite in our household. We have these for breakfast once to twice a week.

This basic recipe is enough for one to two people, depending on how much you’ll eat. I multiply it by three for us (we have healthy appetites) and usually have about two to three left that are eaten as a snack later in the day with peanut butter. So here goes:

COCONUT FLOUR BREAKFAST CRUMPETS

Ingredients
30ml coconut flour
2 large eggs
5ml (1 tspn) psyllium husks
30-60ml water
Coconut oil for frying

Method
Mix the first two ingredients well. Add the psyllium husks and mix immediately. Add 30ml water and allow to stand for a few minutes while warming up the frying pan with a dollop of coconut oil. If the mixture looks a bit thick add a bit more water until desired consistency is reached. When pan is warm add about 30ml per crumpet into the pan and fry. These cook quite quickly and normally only need to be flipped over once.

When I multiply this by 3, I normally only add 10ml psyllium husks as they swell quite a lot.

These are delicious served with yoghurt or home-made ricotta, sugarless berry compote, and grain-free muesli. Look out for future posts with recipes for the last three. You can add what you’d like… bacon, tomato, avo… the list is endless.

Here’s to them becoming a firm favourite in your house too!
Rene
Banana and Carrot Loaf

Tags

, , , , , ,

Banana and Carrot Loaf


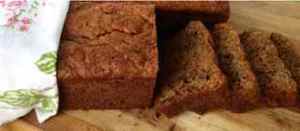
We always seem to have slightly over-ripe bananas in our fruit basket. Neither the boys or myself are partial to them when their flesh is no longer firm. This is one of my favourite ways to use bananas. The loaf freezes well and can also be made into muffins (adjust the baking time accordingly). I normally end up making triple the batch. These are a lovely treat at snack time and I have even used them to make french toast. Although this recipe is made with rye flour, I imagine you could use normal cake flour if you do not have a wheat allergy/intolerance. This recipe has been slightly adapted from the one in the cookbook I mentioned in my previous post – Rye Flour Finger Rusks. Please see the note at the bottom for variations or additions.

Banana and Carrot Loaf

Ingredients

1 cup sugar (200g) (I use brown)
200ml oil (sunflower, canola or coconut)
3 large eggs
1 cup mashed banana (250g)
1cup finely grated carrots/butternut (125g)
425ml rye flour (200g) *see note
7ml bicarbonate of soda
4ml cream of tartar
Pinch of salt
10ml ground cinnamon (can be omitted)

Method

Preheat oven to 180˚C.
Beat sugar, oil and eggs until fluffy. Add the banana (I add it whole and weigh on the scale, then continue beating until it is well blended) and carrot/butternut and beat to mix.
Sift flour, bicarbonate of soda, cream of tartar, cinnamon (if using) and salt. Add to the banana mixture and mix for a short time until everything is incorporated.
Pour into two greased medium loaf tins or one large loaf tin. Smooth the tops to make them level.
Bake at 180˚C for 20 minutes. Reduce the temperature to 160˚C and bake for further 15-20 minutes until a skewer comes out clean. If you are using a large loaf tin, the baking time might need to be extended. Cool on a wire rack.

*If using cake flour substitute 425ml. Do not substitute the same amount in grams as they differ in weight.

Additions
Pecan nuts (100g) or sesame seeds (50-100ml) or dessicated coconut (50-100ml).
Cocoa (50-75ml) but increase the amount of oil by 20-40ml.

These can be eaten as is or spread with peanut butter, honey or cottage cheese.

Til next time..

Rye Flour Finger Rusks

Tags

, , , , ,

Rye Flour Finger Rusks

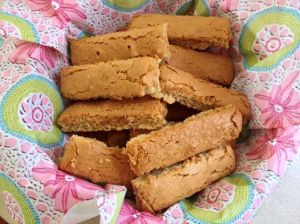
Being South African, rusks are an integral part of my life. I wake up every morning with freshly brewed filter coffee and a rusk to dunk. My favourite have a whole lot of nuts and seeds and texture. When my oldest wanted to join in the morning ritual, I had to make a plan as he is intolerant to a few of the ingredients in mine. It was then that a friend introduced me to a local recipe book specifically for people with food allergies and intolerances. The book is called ‘South African cookbook for allergies and food intolerances’. It is available in English and Afrikaans. This recipe is from there with a minor change. They are similar in taste to finger biscuits. Ideal for young children as they are less likely to choke on some nut or seed. So, without further ado, here is the recipe.

Rye Flour Finger Rusks

Ingredients

3 eggs, separated
80g brown sugar (can use white)
25ml oil (I use canola but have used olive oil and will probably use melted coconut oil in the future)
75ml water
25ml honey (can substitute with syrup or molasses)
pinch salt
100g rye flour (200ml)

Method

Preheat oven to 160˚C.
Grease and line a swiss roll tray with baking paper
Whisk the egg whites until stiff. Add the sugar gradually to form a stiff meringue.
Add the egg yolks gradually, while beating at a low speed.
Mix oil, water and honey. Add to the egg mixture, while beating at a low speed.
Sift salt and flour together. Add to the egg mixture in 3 parts, still beating at a low speed.
Pour batter into the baking tray and smooth the surface.
Bake for 40-45 minutes, until golden brown and firm to the touch. Allow to cool in baking tray.
Cut into 3 strips and then into fingers.
Dry in the oven at 80-90˚C for approximately 4-5 hours.

I have a large rusk pan and triple this recipe to make 75 rusks. If I’m going to all this effort, I need to make a big batch.

This recipe can also be used as a pie case. Don’t dry it out in the oven then!

I’m off to enjoy a cup of tea and work on a seed and nut rusk recipe. Let me know what your favourite rusk is…


Grain-Free Pumpkin/Butternut Bars

Tags

, , , , , , ,

Grain-free pumpkin-butternut bars

Autumn has slowly been making it’s presence known. It’s evident in the slight morning chill, the earlier sunsets and cooler evening temperatures. We are still blessed, however, to be enjoying lovely temperate days and the occasional visit to the beach has been possible. Where we live, we do not experience the changing hues of the tree foliage as much as in other parts of the country or world. So I decided to try these autumn-coloured bars. Flavoured with just the right amount of cinnamon, ginger, nutmeg and cloves, the gentle fragrance comforts the soul and hints at the lovely stews and curries that are synonymous with winter.

Super easy to prepare. This recipe can be doubled. To make it a little more special, serve with a maple-pecan glaze (recipe to follow soon). Lovely to put into your little one’s lunch tin as a surprise.

The pumpkin/butternut puree can be made by steaming the veg in a steamer or in a pot with a little water on the stove until tender and easy to mash. I use my stick-blender with it’s masher attachment or I place it straight into the food processor fixed with an S-blade. Once it’s all mashed/pureed, I add the rest of the ingredients.

Grain-Free Pumpkin/Butternut Bars

Preheat oven to 180˚C once the puree is ready.

Ingredients

½ cup pumpkin/butternut puree
½ cup almond butter* (see note)
⅓ cup honey
2 eggs
1 teaspoon ground cinnamon
½ teaspoon ground ginger
¼ teaspoon ground nutmeg
pinch cloves
¼ teaspoon salt (I use Himilayan Crystal Salt)
½ teaspoon bicarbonate of soda

Method

Grease a 20x20cm baking dish with coconut oil or butter.
Once the pumpkin/butternut has been pureed, add the rest of the ingredients to the food processor (I have succesfully mixed this with a handheld mixer too).
Mix well until all the ingredients are combined.
Pour into baking dish.
Bake for 20-25 minutes until top is firm when pressed.
Remove from oven and allow to cool in the dish.
Cut into squares and eat with your choice of tea or coffee.

These can be stored in an airtight container in the fridge for up to a week. I have not tried to freeze them as they never last that long in our family but I think they would freeze well.

*Almond butter is expensive so I make my own. Watch out for my post on that soon. Peanut butter can be used as a substitute without compromising on texture or taste.

Happy baking…

Sesame Seed Carob/Cocoa Melts

Tags

, ,

Image

I am always on the lookout for healthy treats to give my boys as an alternative to the sugar-laden, artificially coloured sweets available. Of course, I am only too happy to indulge my sweet tooth, guilt free, as well. These sesame seed treats immediately grabbed my attention when I came across them on Pinterest. I adapted the recipe slightly to suit our needs and to the ingredients which I had available. Sesame seeds are rich in calcium and if you have to restrict your dairy intake, this is a wonderful way to add calcium to your diet. I’ll often give these to the kids when it’s late afternoon and they need a little pick-me-up before bath and dinner time. Does the trick to lift those blood sugar levels and maintain a happy home.

For the original you can go to http://sweetroots.blogspot.com/2012/04/mommy-monday-sesame-seeds-as-bone.html.

Sesame Seed Melts

Ingredients
1 cup sesame seeds
½ cup carob powder or cocoa powder (I prefer carob for these)
4 tablespoons (60ml) honey
4 tablespoons (60ml) coconut oil (melted)*

Method
1. Grind sesame seeds in food processor** finely ground (at least five minutes – you can add 1 T of the coconut oil at this point which seemed to help).
2. Add remaining ingredients and process until well-combined and smooth.
3. Place wax paper inside an 15x19cm pan and pour mix in. Refridgerate until set (at least an hour). Cut into small squares.
4. Store in the fridge as they become very soft at room temperatre.

*I have used normal coconut oil and deflavoured coconut oil for these. Both taste equally deilicious but I tend to prefer those with the normal coconut oil.
**I have a stick blender with a chopper bowl attachment. This works very well. Alternatively, use a coffee grinder (make sure you wipe it out before you use it) to grind the seeds in batches.

Yum Yum. Hope you enjoy these as much as we do…

Flourless Banana Peanut Butter Muffins

Tags

, , , , , , ,

Flourless Peanut Butter Banana Muffins

These muffins are a treat. Easy to prepare, suitable for gluten and dairy intolerances, grain-free and most importantly, delicious. I bake them at least twice a month as snacks for the boys. As they are naturally sweetened with honey, these are a definite favourite as a nutritious and healthy alternative. They store well in an airtight container in the fridge for up to a week (mine never last that long). Eat them just like that or add your choice spread.

I first came across these muffins on detoxinista.com. Go ahead and try them. Let me know what you think.

Flourless Peanut Butter Banana Muffins
Prep time:  15 mins
Cook time:  15-20 mins
Total time:  30 mins
Serves: 12
Ingredients
  • 1 cup peanut butter (I use a sugar free one)*
  • 2 very ripe bananas, mashed (about 1 cup mashed)
  • 1 teaspoon bicarbonate of soda
  • 1 teaspoon vanilla extract (optional)
  • 3 whole eggs
  • ½ teaspoon salt (I use Himalayan Crystal Salt)
  • ¼ cup honey (or stevia, to taste)
  • 1 teaspoon cinnamon
Instructions
  1. Preheat your oven to 180C and prepare a muffin tin with 12 paper liners.
  2. In a medium bowl, combine all of the ingredients and mix until smooth.
  3. Scoop the batter, filling each cup to ¾ full.
  4. Bake for 15 minutes at 180C. The resulting muffins should be firm, and lightly golden.
  5. Allow to cool for 15 minutes before removing from the pan.
  6. Serve immediately, or store in a sealed container in the fridge.

Enjoy as a snack or as a quick breakfast substitute if you need to eat something on the run.

*If you want to make this recipe nut free, try sunflower butter as an alternative.

Til next time…

Why Blogging?

Tags

I am no techno junkie. In fact, I am probably the total opposite: technologically challenged. I am no writer. Far too often, I find myself at a loss for words. Why, then, did I decide to enter the world of blogging? Simple, really.

Since I can remember, I have enjoyed pretty much anything that has to do with food. Feasting on it with my eyes; to savouring it mouthful by mouthful; to relentlessly perfecting a recipe; to preparing a simple meal or feast for loved ones and friends. My love for delicious, nourishing and sometimes decadently outrageous fare is endless.

After we discovered that my oldest child had several food allergies and intolerances, I was on a mission to find delicious recipes that he and we could all enjoy. I needed a place to share my discoveries with friends. What better place than here? This is where I will post various recipes, some for the intolerant or allergic individual and some that friends have been asking after for years. I hope you’ll be inspired to try them. Some will require minimal effort and others a little more. I welcome your feedback and comments. Look forward to hearing from you…